Button Box update
INSIDE : Learn how to update and transform a thrifted button box into something special. Transform it from a simple wooden box to a graphic box to set out on display in your home.

This post may contain affiliate links. See full disclosure here.
This post has been updated since it’s original publish date of September 2014.
I am continuing with my Guest Room + Office series (here is the reveal!), but today I am sharing a quick update for a Button Box that goes in that room.
Want to see some of the other creative crafts I’ve made for this room?
- Pom Pom Throw Blanket
- How to paint a Gold and White Striped Trunk
- How to wrap an open light fixture cord
- Desk Lamp revival
- Cassette Case turned Memory Box
- Tree Stump Chalkboard
I wish I knew the origin of this box. I think it’s been in our home for at least 8+ years. I have a sneaky feeling it was my husband’s and now… it’s mine, ha!
What supplies do I need to update an old button box?
- Wooden Box (thrifted or new)
- Washi Tape (or painter’s tape works also)
- White Spray Paint

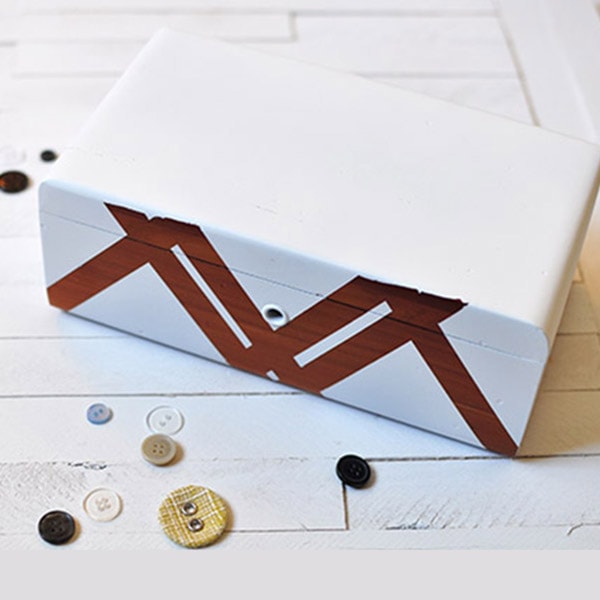
I love the wood grain of this box, but the color wasn’t my favorite. I decided to keep a bit of the original wood coming through with this super budget friendly update!
How to transform a Button Box
Clean the box
To transform and paint a wooden box, the first step always is to give your box a good cleaning. I simply used a little vinegar spray and some paper towels to wipe some of the dust and grime off before starting any painting.
Add painter’s tape
Next, decide on your pattern design. I love combining natural and modern, so I decided to keep most of the box a simple white – but to do my design just on the very front face.
Using washi tape or painter’s tape, tape off your geometric pattern. I centered mine on the key hole and did simple diagonal criss cross stripes.
Be sure to push on the edges of your tape for a good secure hold.

Add white spray paint
Take your box to a location with good ventilation and give it a few swipes of white spray paint. Allow for the paint to fully dry before adding another coat.

Remove tape
Then comes the best part, removing the tape!
Slowly start at one end and lift up the tape to remove your beautiful design.

What an easy transformation and well worth the minimal effort.

I have done so many fun painted and patterned boxes over the years!
Here are a few of my favorite ones...
I have one that I got when I graduated from High school. Was doing a little searching on the web today about them, they are collectable and I seen prices ranging from $45-$60 for them. The store name in the lid makes them collectable advertising history. I wouldn’t change mine no matter what.