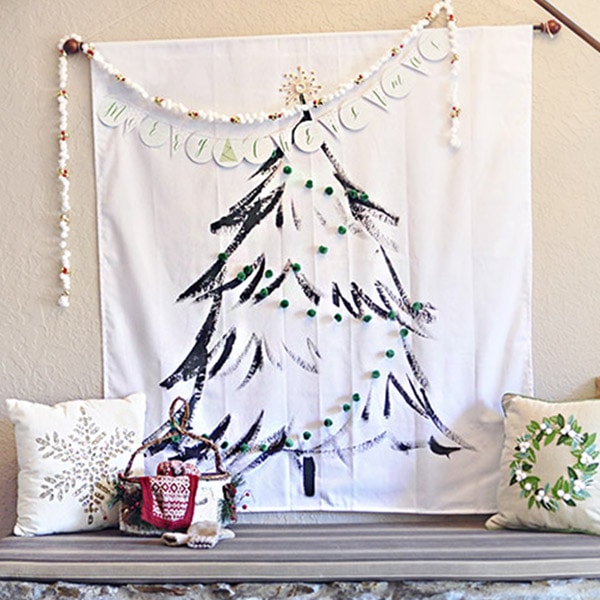
DIY Christmas Tree wall hanging (Perfect for Small Spaces!)
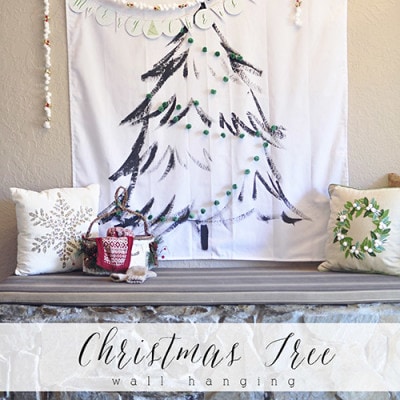
INSIDE : Learn how to create a Christmas Tree wall hanging using a plain white tablecloth. Just because you may not have room for a tree does not mean you can’t enjoy one on the wall this holiday season.

This post contains affiliate links. See my full disclosure here.
This post has been updated since it’s original December 2014 publish date.
Last week I shared my Christmas Home Tour and promised to share my Christmas Tree wall hanging with you all. I fell in love with this beautiful tree fabric from Ikea but alas, with no Ikea in our entire state I had to take matters into my own crafty DIY hands!
Why You’ll Love This Space-Saving Christmas Tree
If you are tight on space or have a tight budget, that doesn’t mean you can’t still enjoy and decorate for the holiday! Creating a Christmas tree wall hanging still is festive, fun and a great way to customize your tree just how you like it.
It’s also kid friendly, pet friendly and a great idea for apartment living.
Let’s talk about what you need to create this adorable project.
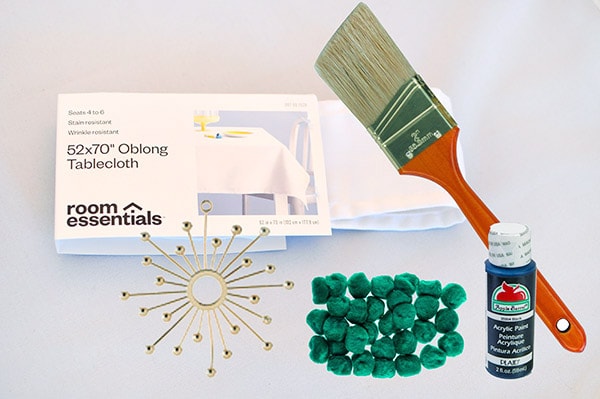
Supplies needed for a Fabric Christmas Tree
- White Tablecloth
- Black Acrylic Paint + Textile Medium
- Painter’s Cloth
- Pencil
- Sewing Scissors
- Wooster handheld Paint Brush + a wide craft brush
- Emerald Green Pom poms
- Gold Ornament (Used for the tree topper)
- Curtain Rod that is wide enough to hold your tablecloth up
- Hot Glue Gun
- OPTIONAL – iron-on bonding tape
How to make a DIY Christmas Tree Wall Hanging
To make this cool canvas Christmas tree, start by holding the tablecloth up to your wall to determine the appropriate size for the space you have.
Our entry wall connects to the staircase at the second floor and has an odd indoor planter (that I turned into a bench) at the bottom. Being that it’s an odd shape, I could squeeze about 4.5′ in height and still have it fit correctly.
Step 1: Measuring and Cutting the Fabric
Once you know the space you will be hanging this Ikea fabric hack project, measure and mark your tablecloth then cut to size.
Step 2: Drawing the Evergreen Shape
Now that you have your cloth cut to size, it’s time to draw your tree shape. You can go as simple or complex with creating a Christmas tree as you want.
How do I draw a Christmas Tree?
To draw a Christmas tree, first start with using a pencil. Decide how tall and wide you want your tree.
In case you didn’t know, prior to starting this blog, I was practicing landscape architecture. I worked at a landscape architecture office for eight years, so drawing trees (and plants) is not very intimidating for me.
Draw a triangle using up as much of your drawing surface as possible.
Next, draw about three or five “levels” or “branches” to one side of your triangle’s outer edge. Always draw in odd numbers. (I went with five branches.)
Then, not perfectly but close to the same areas, match that same number of branches on the other side of your tree.
Step 3: Painting and Assembly
Make sure to first put down a painters cloth on the floor so as to not have any paint bleed through to your floor or table.
Since you’ve already drawn your basic tree shape with a pencil, simply add Textile Medium to your black acrylic paint and get ready to paint! TIP – The textile medium helps to keep the paint from cracking as your fabric bends and moves.
Loosely paint each section of your tree. For the bottom of your Evergreen tree, add some ruffled line work to indicate the bottom branches.

Now, that the basic shape is painted on, you can add in interior branches. I like to make one side a little darker and thicker with paint and then a little less on the other side. It help give the illusion of a shadow, where the sunshine may be hitting it.
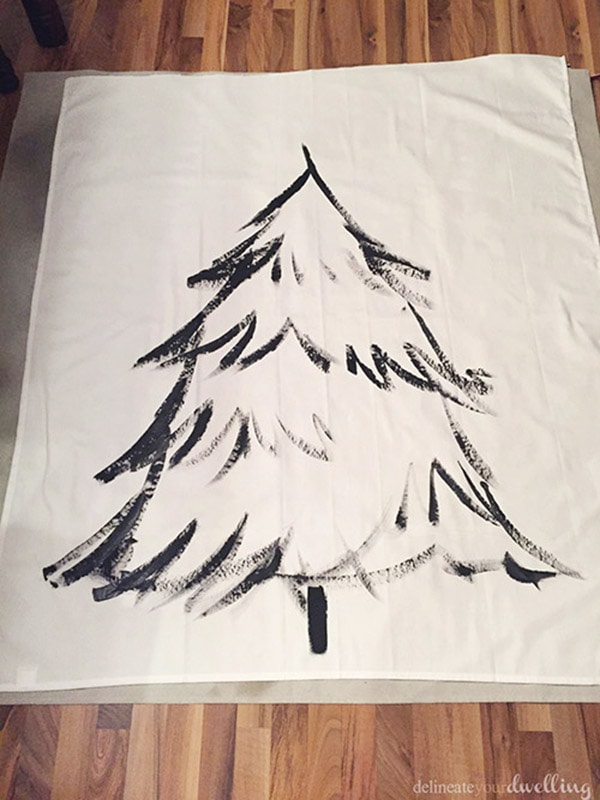
Allow your tree to dry overnight.
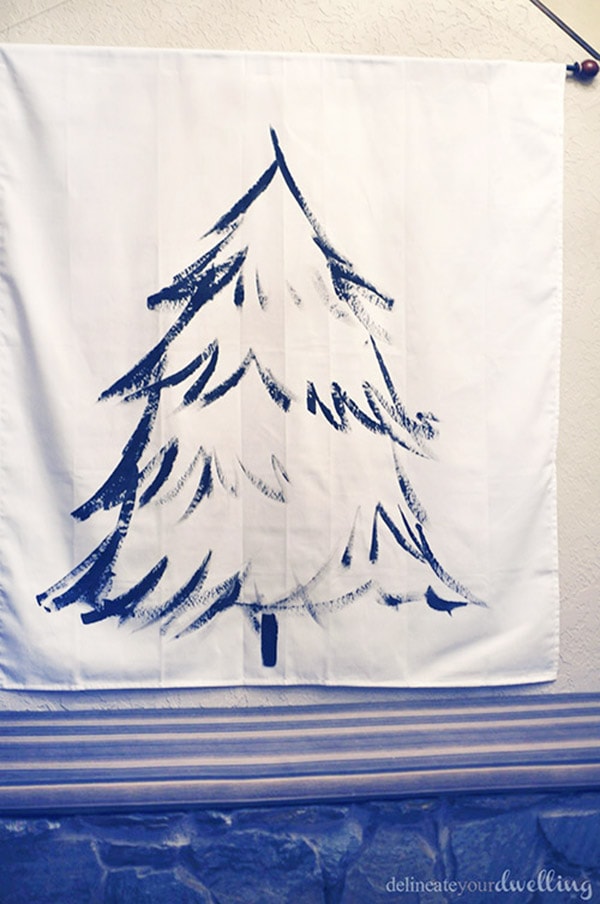
Step 4: Hang on a curtain rod
Lay the curtain rod on the backside of the tree hanging once it’s dry and fold the tablecloth over a few inches to make an even seam.
You could definitely sew the hem or even use iron-on bonding tape, but I went the quick and easy way and used hot glue. The tablecloth didn’t weigh anything, so I was confident the glue would hold just fine.

Step 5: Hang rod on wall
Based on how heavy your wall hanging is, use twine, ribbon or rope to secure the rod to the wall. You can use a command strip, but I choose to use a small nail for mine.
Adding decor to your DIY tree
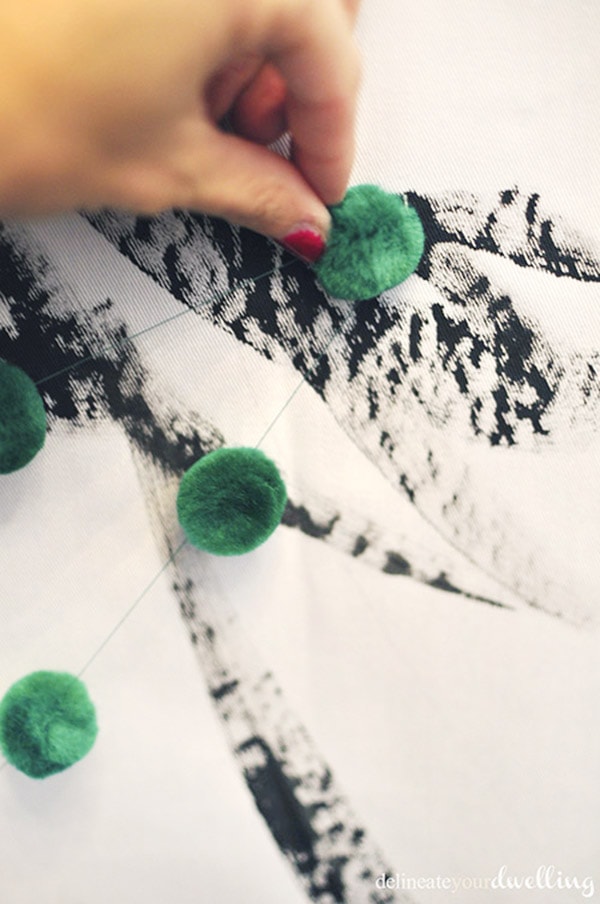
I wanted a very simple look for my tree, so I strung Emerald green pom poms on green thread and used that for my tree’s garland. This makes this project a very Kid-friendly Christmas decoration!
I hot glued the end pom poms of each “branch” so they hung organically, but kept their tree shape.
I then printed out a Green Merry Christmas Garland and hung that along the top. Creating space-saving holiday decor is so essential, when you don’t have much room for a huge tree.
Also being able to roll this wall hanging up at the end of the season and store it so small is an awesome perk, too!
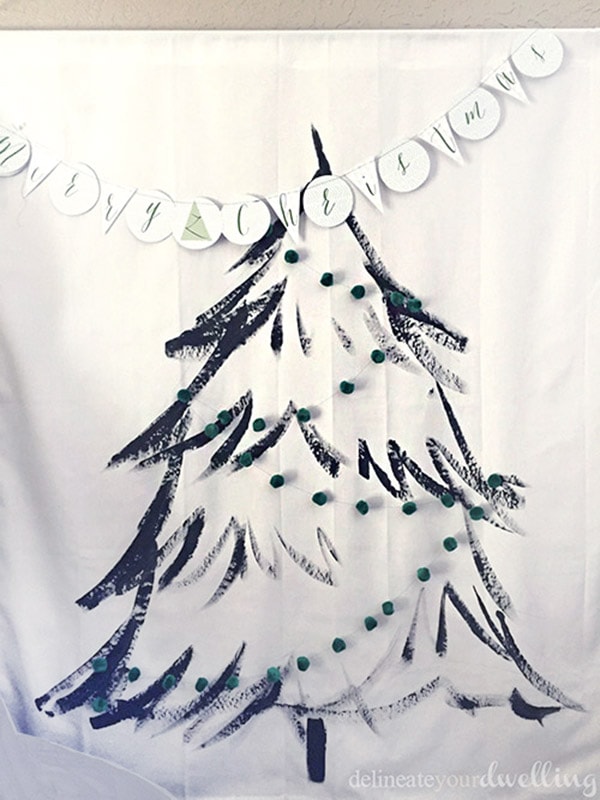
I ended up adding a final touch of a red and white pom pom garland. Then I glued a gold ornament for a tree topper and it was done!
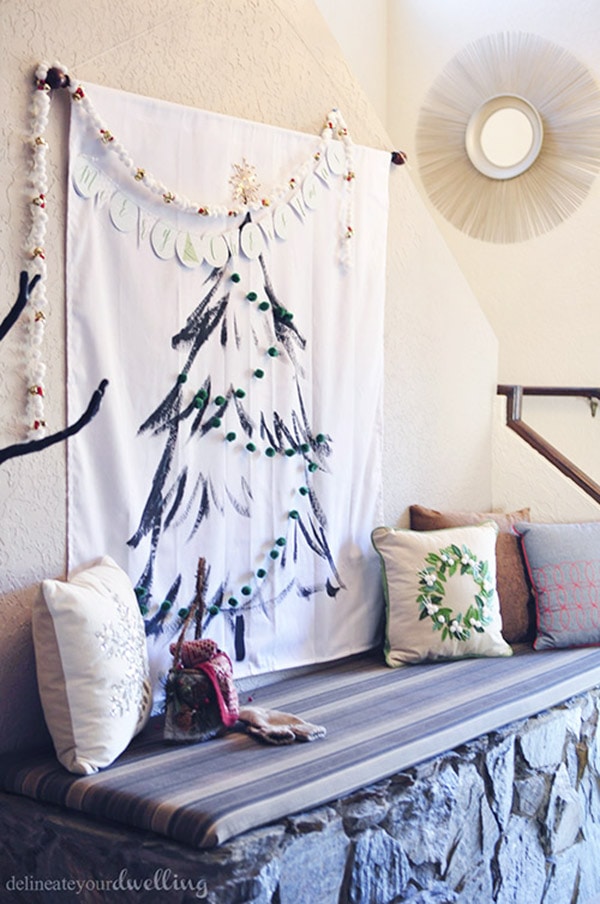
Love that Sun burst mirror in the background? Check out how I made it, here.
I really love how this Apartment sized Christmas tree turned out. It’s very bold and graphic and has the potential to be changed up year after year based on what “ornaments” or garlands you hang on it.
CREATIVE CHRISTMAS TREE IDEAS
– Modern Colorful Christmas Tree – As featured in December 2019’s edition of HGTV Magazine
– Natural Modern Flocked Christmas Tree
– Monochromatic Nature inspired Christmas Tree
– Peaceful Woodland Sparkle Christmas Tree – This was my favorite tree of all time
– Burgundy Floral Christmas Tree
– DIY Christmas Tree wall hanging (Perfect for Small Spaces!)
– Rustic Twig Christmas Tree
If you liked this project, you might like some of these other Christmas projects I’ve crafted.


Looking for even more creative holiday ideas? Check these out…

DIY Christmas Beaded Candle Cuff
How to Make DIY Oversized Candles in Windows
DIY Dried Persimmon Garland for Christmas

Marble Dipped Oreos
DIY Christmas Tree wall hanging (Perfect for Small Spaces!)
DIY Colorful Advent Calendar + Free Activity Printables