Budget Kitchen Renovation Plan

INSIDE : Get an inside look into the plan for renovating a kitchen for less. Find budget friendly tips and tricks to save money while getting a high end look.

This post may contain affiliate links. See full disclosure here.
This post has been updated since it’s original February 2014 publish date.
In 2011 we transformed our home’s original kitchen from a 1970’s vibe to a much more modern and current style along with adding a pantry and some more usable cabinets.
BACK STORY –
Three years ago, the husband and I were expecting our first baby and it felt like having free time for DIY might suddenly become a rarity with a new baby around. So, we decided to completely gut and renovate our kitchen before her arrival.
THE BEFORE –
The picture below was taken shortly after we moved in and it stayed looking like this for the following 5 years. Sometimes I wonder why we bought this house when I look back at those early pictures – ha.
We saw potential, but now all I see is a lot of dark, original to the house, very dated cabinetry. Ridiculous fake butcher block counter tops, gross textured stripe wallpaper and a single large florescent light overhead.
There is almost no natural sunlight in this room due to an outdoor covered patio at the only window in our kitchen. This space was not enjoyable to spend much time in.

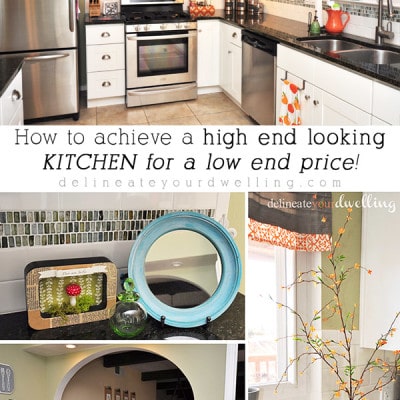
Plan for creating a Budget high end looking kitchen
The plan for our kitchen was one that we worked on for quite some time. We knew we wanted to make quite a few big upgrades, but it was important to us to keep our costs down as much as possible.
How much did our budget kitchen update cost?
We looked into doing a kitchen overhaul from Home Depot’s design services and it was going to easily cost us $35,000 to $40,000 for the items we wanted. That was much more than we intended on spending, so we decided DIY was the way we would go.
We ended up spending $15,000 on our entire kitchen, which was a wild savings in our mind!
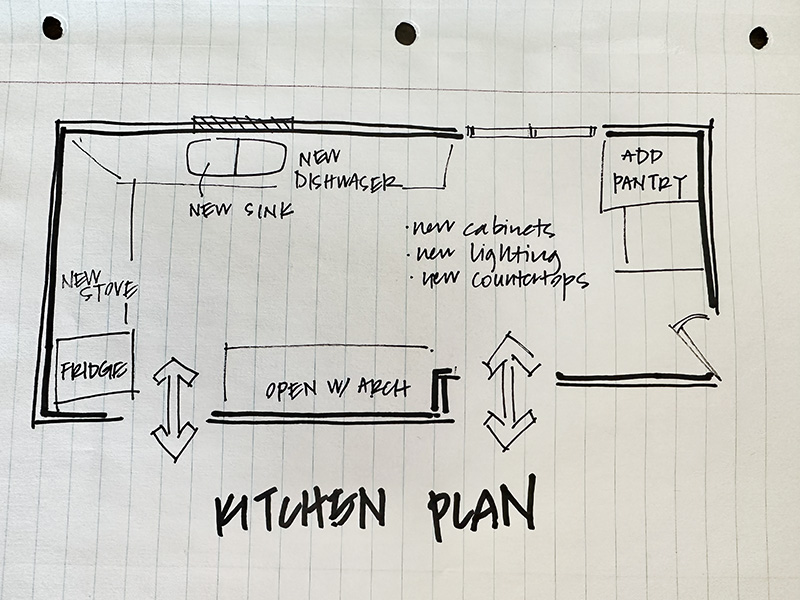
Here was our plan –
-For budgetary reasons, we decided to keep the main layout of the kitchen the same, but add a pantry cabinet.
-All appliances were updated, but stayed in their same location.
-Flooring would remain
-We would do a demo of cabinets, soffit, ceiling ourselves
-Hire a professional to create an arched pass through
-Hire a professional to texturized walls
-Hire an electrical professional to add new lighting to replace the florescent light and in-ceiling speakers
-We decided to remove our cabinets due to their low quality and install flat packed new cabinets
-Paint walls
-Install tile backsplash + grout
Removing kitchen wallpaper
The very first step to get a high end look, is to do most of the work yourself. Let me repeat, DO A LOT OF THE WORK YOURSELF.
One night when my husband was gone for a few days on travel, I grabbed a paint scrapper and started taking down our awful wallpaper.
Start at a corner or seam and use the scraper to gently lift and peel off the wallpaper. Work in small sections, pulling the paper downward at a 45-degree angle.
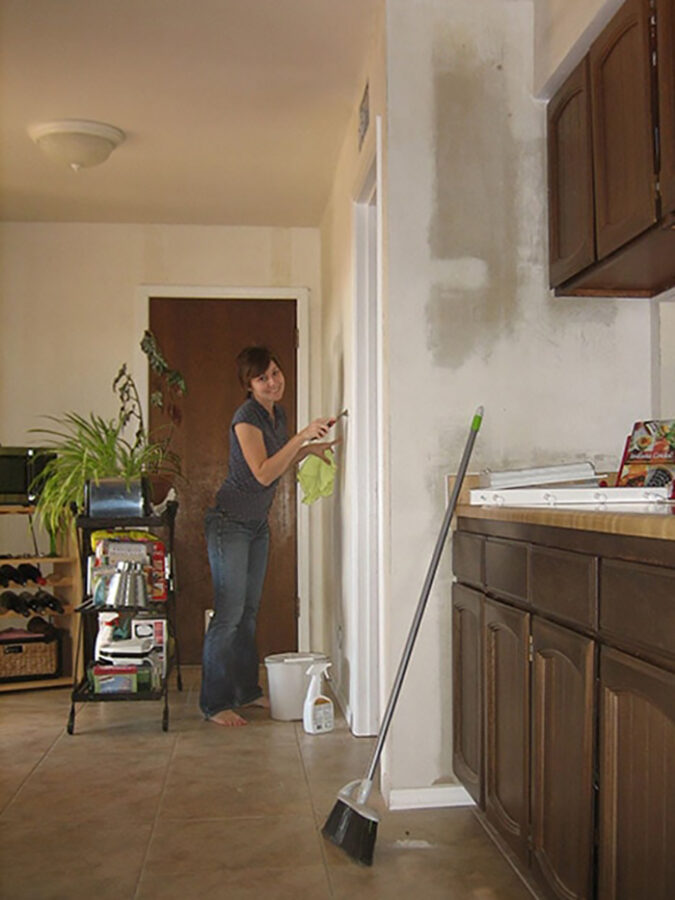
Once I removed the wall paper, there was quite a bit of glue, bare drywall and a few spots of mold. Obviously, we took care of the mold areas, but the bare drywall was left like this for quite some time. We even hosted my family for Thanksgiving while the entire kitchen was scraped down and definitely not looking nice.
Paint the Walls
Once all the wallpaper is removed, wash the wall with warm, soapy water to remove any remaining wallpaper adhesive residue.
Let the wall dry completely before painting or applying new wallpaper.
I choose to paint our kitchen a lovely soft sage green. The horrible florescent light we had gave the walls a much more intense green look than they really were.
I loved adding a bit of color to the room, but with the lighting and the dark cabinetry, it still felt like a dungeon. A happier place, but a dungeon none the less.

Kitchen Progress –
Patience
Step two for getting that high end look on a budget is patience. It always is so great to start a project and two simple weekends later, presto a completed product.
However, in DIY and especially in kitchen remodeling, that is rarely the case! Our kitchen sat at this exact stage for another year or two.

Next I will be sharing the process of removing our cabinets and opening the space up into our dining room.
You will see how all these steps are actually quite do-able and inexpensive if you are smart about them!
Be sure to check out the next step in this project – Kitchen Cabinet Demo and see the final Updated Kitchen Reveal post!