DIY Wooden Starburst Tree Topper


INSIDE : Learn how to make a DIY Wooden Starburst Tree Topper for your Christmas tree this year. It has a very Scandinavian holiday feel and definitely gives your tree that wow factor!
This post may contain affiliate links. See full disclosure here.
I just recently shared my participation in the 7th annual Holiday Tree blog hop. I shared my Peaceful Woodland Sparkle Christmas tree. It was full of woodland sequins bugs, peace signs and disco balls. I really had a wonderful reaction to it, but was surprised when the most commented element of the tree was the tree topper I quickly DIYed late at night without taking any photos or videos (silly blogger). After so many requests, I decided to make another one and gifted it to my local church.
And it’s fun that one of the most popular shape for a tree topper is a star, representing the Star of Bethlehem. A sunburst and star seem awfully similar… I must be on the right track.
Let’s get into how simple this striking topper is to make!
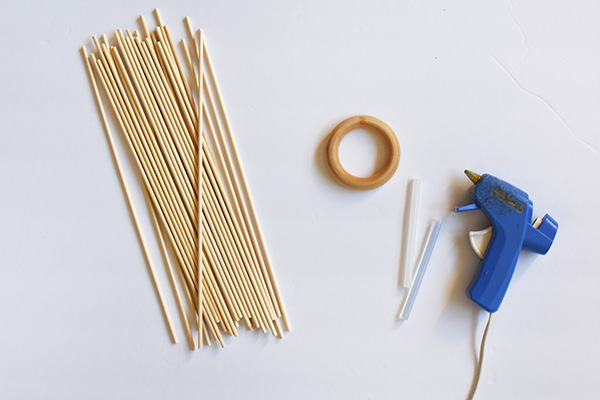
What supplies do I need to make a DIY Starburst Tree Topper?
Wooden Skewers
(2) 3″ Wooden Ring
Hot Glue gun
(2) Small pieces of cardboard
Scissors
Pencil
How do you make a Wooden Star Tree Topper?
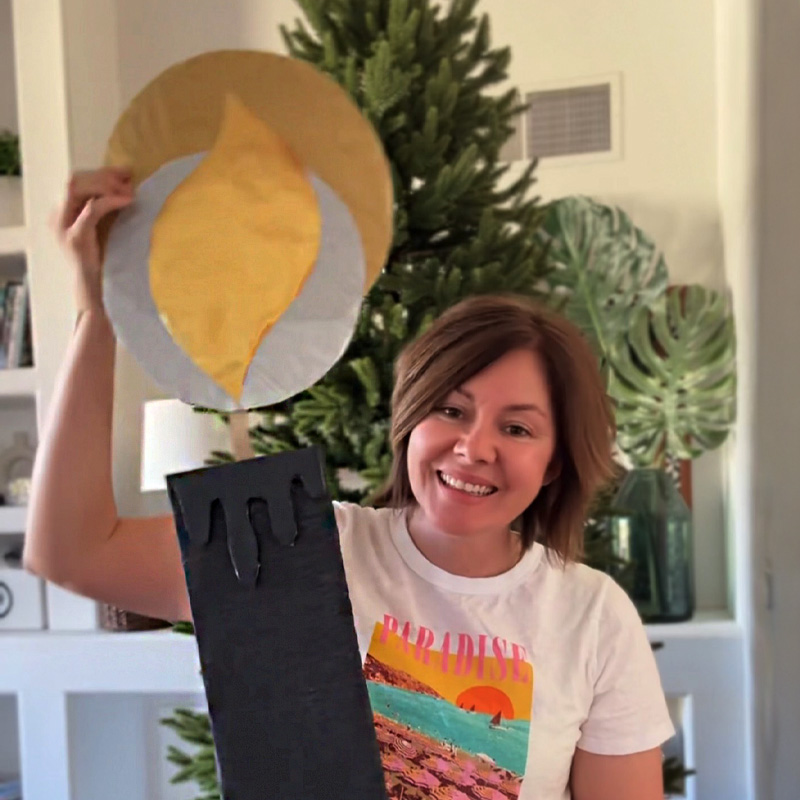
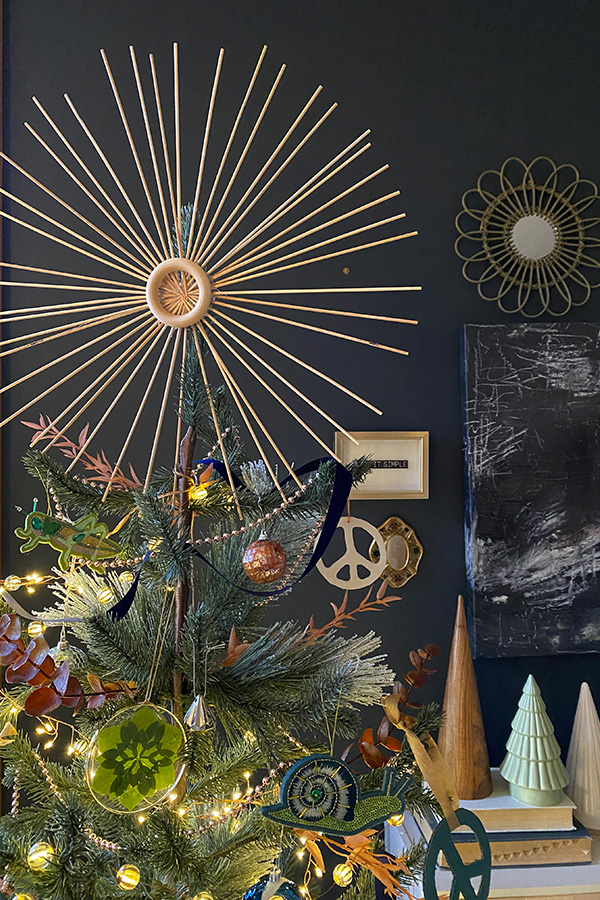
Start by placing your wooden ring down on a flat surface and hot gluing four skewers down on each cardinal direction. Lay them out so that their tips come together nicely in the center.
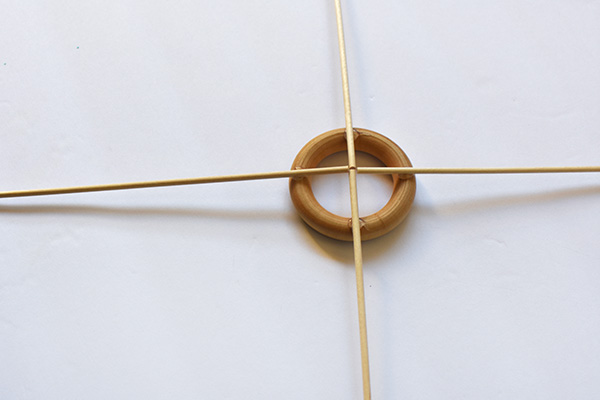
Next hot glue in four additional wooden skewers to break up the first four you glued down. You should now have the ring glued in 1/8 segments.
Depending on if your skewers are tapered on one end or not, it will change how you can layout your pattern for the remaining skewers. On my original tree topper, I had tapered ends so I was able to glue down quite a few more skewers than on this one.
I realized, creating this little pattern worked well for the non-tapered skewers that I was using. Two outside skewers up close to the center and two skewers down a bit further.

Continue hot gluing until you have filled in each of your 1/8 segments on the wooden ring.

Making your Tree Topper Double Sided
At this point, you are officially done with your topper, however I decided to give it a more finished look. I needed my wooden tree topper to look nice from all angles, so I simply hot glued another wooden ring to the other side.

Create the center of a Christmas Tree Topper
Trace the inside circumference of a spare wooden ring onto a piece of cardboard. Cut out two of these circles with your scissors.

Once cut out, add hot glue and tuck the cardboard into the rings creating a beautiful cover and very finished looking piece!

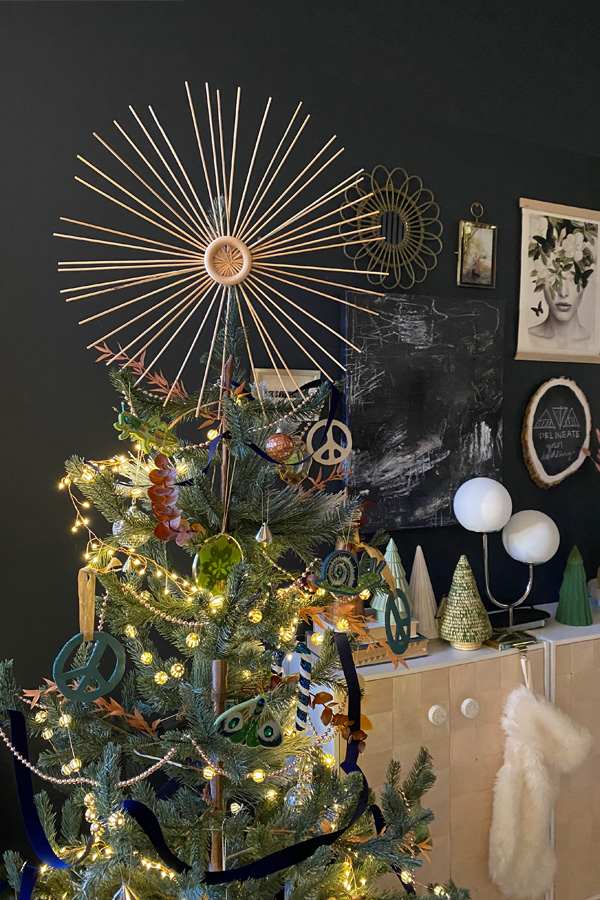
DIY Scandinavian Tree Topper
Because of all the sticks on this Scandinavian looking tree topper, it is the simplest thing to stick on your tree. I have used it on two separate trees now and it takes about 2 seconds to get in place.
It makes such a statement for practically no cost, which is my favorite thing!
Want to see more details on my Peaceful Woodland Sparkle tree? Head on over and take a look.
Light up Starburst Star Christmas Tree Topper
This would be such a simple tree topper to add twinkling fairy lights to! Although the skewers are on the more delicate side, fairy lights have such a thin wire that it would have no trouble holding it up.
I may have to give it a try and come back with an update!

DIY Wood Tree Topper
Learn how to make a DIY Wooden Starburst Tree Topper for your Christmas tree this year. It has a very Scandinavian holiday feel and definitely gives your tree that wow factor!
Materials
- Wooden Skewers
- (2) 3″ Wooden Ring
- Hot Glue gun
- (2) Small pieces of cardboard
- Scissors
- Pencil
Instructions
- Place the wooden ring on a flat surface and hot glue four skewers down on each cardinal direction. Lay them out so that their tips come together in the center.
- Next hot glue four additional wooden skewers. You should now have the ring glued in 1/8 equal segments.
- Continue gluing skewers around the ring until you have filled in each of your segments on the wooden ring.
- Hang on your tree and enjoy!

Looking for some other great Holiday DIY project ideas?