Painted Mason Jar + Giant Poms
INSIDE : Learn how to create the most precious garden party accessories, painted mason jar and giant poms. The perfect finishing touches in soft peach and bright coral colors!

This post may contain affiliate links. See my full disclosure.
This post has been updated since it’s original April 2014 publish date.
Today will be my last post on the Garden Party I hosted a few weeks ago. I will be sharing how to paint mason jars and create giant poms!

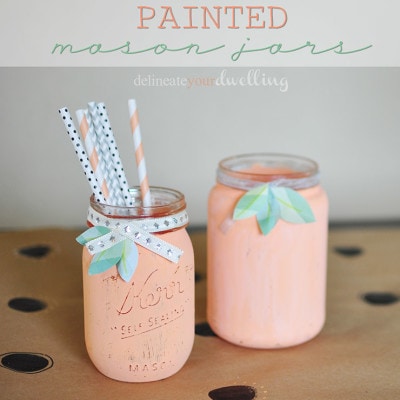
My garden party was heavy on plants and earth colors (green plants and browns in the tablecloth) so I knew I needed a pop of color. I went with one of my favorite colors, a peachy soft coral color. One place I used that color was in my planted ampersand. I also added some color to a few jars, too. I had been wanting to paint a mason for.ev.a. so I was really excited about this.
How to paint Mason Jars
When painting mason jars, the first thing to do is pick your paint colors! I decided on mixing a few different coral, orange, peach and white acrylic paints. Then, using a sponge brush, I mixed my paints applied to the jar. I also painted an old pickle jar. I let them dry and then applied another coat.
Once the jars were dry, I used a high grit sandpaper and distressed them. I could kiss them, they are so cheerful and fun!

I added a cute little ribbon trim to the top of the jar and secured it with hot glue.
Then, I cut out three green leaves from some spare scrapbook paper. This was serious heart pitter patter action here. (I think my husband thought I was going crazy with my wild cheers of joy, as I worked – ha.)

I ended up using the jars for holding extra straws and eating utensils. Be still my craft loving heart.

How to make Giant Poms
These giant poms were completely unnecessary, but they added such whimsy and I hung them from bakers twine on the ceiling. They added the perfect vertical interest over my table area!

You can look at my Learn to make a Pom Pom blanket post to see exactly how to make the world’s easiest pom poms, but hint – using a pom maker makes all the difference in the world.
If you are wanting to make giant poms like I did, then I found using a large piece of cardboard was the best way. Wrap yarn around the card board piece and create as many loops as you can, until you feel you have enough yarn to make a nice dense pom pom.
Cut the yarn and just let the end of the yarn dangle. Then, take a new long piece of yarn and loop it under the center of your cut yarn pieces. Tie tightly, maybe even 3-4x and trim off the excess yarn length.
And if you missed any, here are all my posts from the Garden Party :

Tips for Hosting a Small Garden Party
How to make a Planted Ampersand
How to print Garden Images on Book Pages