Fun Fall Wreath


INSIDE : Learn how to use an inexpensive plastic plate and transform it into a gorgeous and fun Fall Wreath. Hang the wreath indoors or outside on your front door – it is a show stopper no matter where you put it!
This post may contain affiliate links. See full disclosure here.
This post has been updated since it’s original publish date of September 2018.
I love making seasonal wreaths. They are such a fun way to bring your exact style to life. A few other fall wreaths I’ve made are a Yarn Wrapped Twig Wreath and a Green Beaded Wreath.
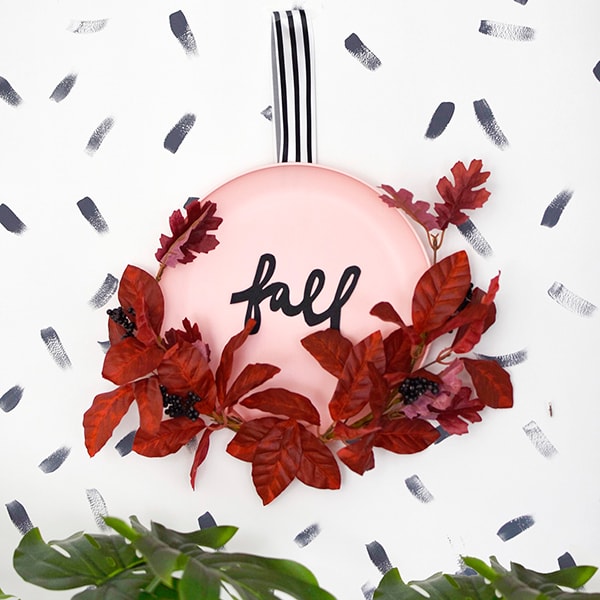
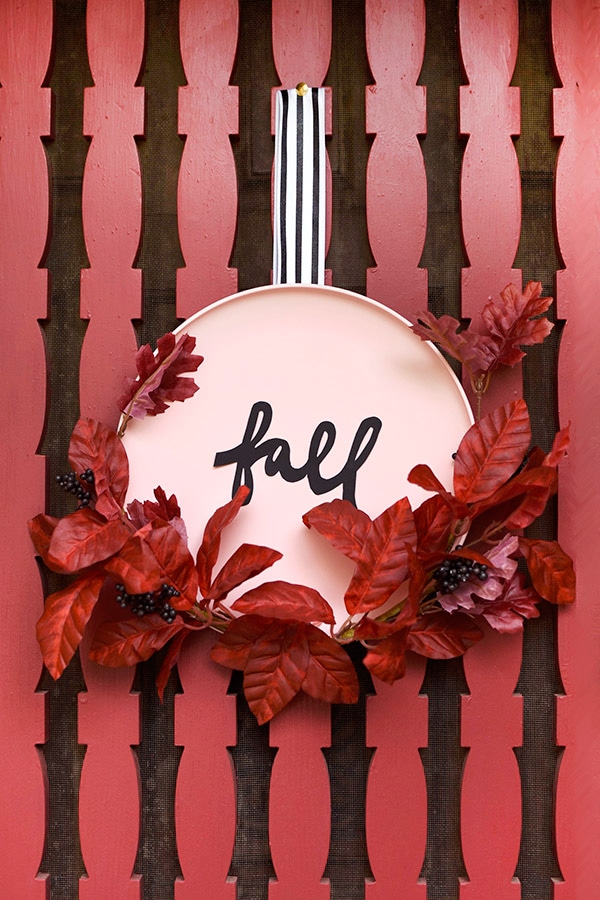
This might very well be one of my favorite fall wreaths I have ever made! A few weeks ago, I put this fun fall plate wreath together on a Facebook LIVE crafting. I was so so thrilled with how it turned out that I decided to make sure and share it with you all, too.
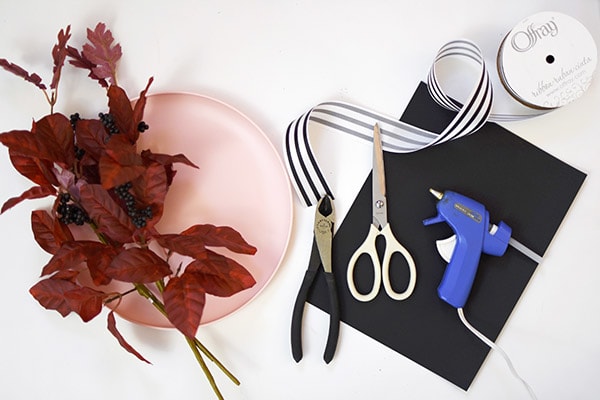
Let’s talk first about the supplies needed to make this wreath.
What supplies do I need to make a plate wreath?
- Faux Fall Leaf stems (two of them)
- Pink Plastic Plate
- Ribbon
- Black Construction Paper
- Wire Cutters
- Scissors / xacto knife
- Pencil
- Hot Glue Gun
How to make a Fall Wreath from a plate?
Prep leaves
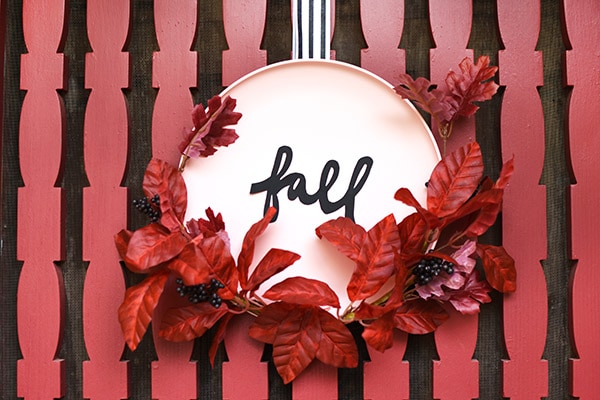
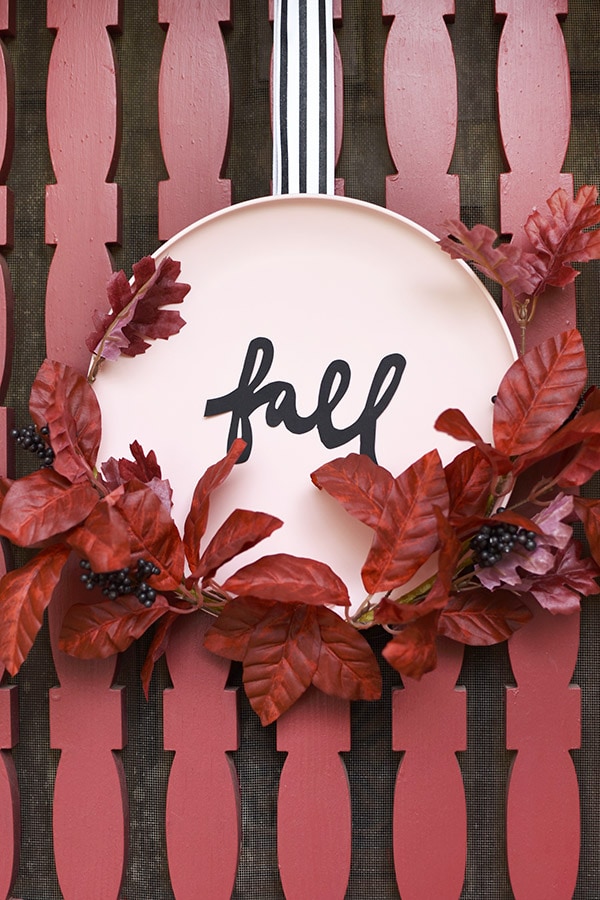
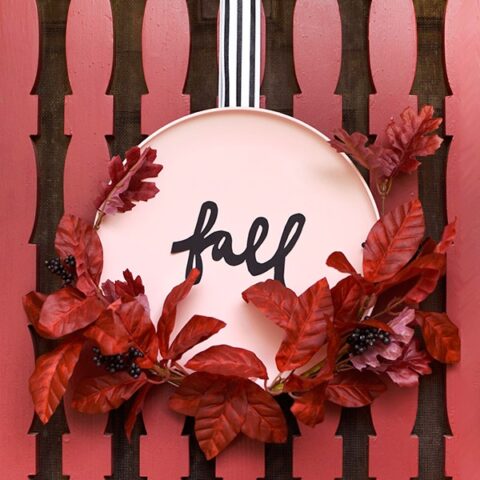
To make a fall wreath using a plastic plate for it’s base, begin by gathering all your faux greenery. I used all red leaves with a few dark purple berries for mine. You may need to use wire cutters and remove some of them from their main stem.
I wanted the leaves on my wreath to be more heavily applied to the bottom portions of my plate, so I created two sections of the leaves. I also pulled a few spare leaves off to cover the area where I was going to secure the two sections.
Start gluing
Once you have your basic layout figured out with the leaves, it’s time to begin to glue them down to the plastic plate. I used hot glue and added a few spots along the sides to secure my leaves down.
Once your leaves are secure, add a single leaf here and there to cover any seams or spots where the wire may show.
Add FALL to the wreath
If you have a paper cutting machine, this is the time to get it out! I didn’t for this project, so I simply used a pencil and drew a cursive “fall” onto black construction paper.
Then, I turned my “fall” into a bubble letter type font and eventually when that looked like how I wanted on the paper, I used a combination of scissors and a xacto knife to cut it out.

Add a ribbon to hang
I used a simple graphic black and white wide ribbon to hang my wreath.
I gathered the ribbon in the back and added hot glue to secure. This wreath isn’t heavy at all, so the hot glue was plenty strong – but if you add additional items to your plate wreath – you may want to use something stronger to hold it up.
Pink and Red Fall Wreath
If you know me at all, you know I very often play around with non-traditional seasonal color palettes. I really loved incorporating these vibrant fall red colors with the soft blush pink.
And added bonus that it goes so well with our red front door screen!
Looking for another fun Fall activity? Check out my Best Fall Coloring Pages!
And isn’t the black construction paper “fall” just the most perfect touch to this fun wreath? Did you catch how I made it? It was not with a fancy cutting machine… be sure to watch the video to see how simple it really was.
Fall Plate Wreath
Learn how to use an inexpensive plastic plate and transform it into a gorgeous and fun Fall Wreath. Hang the wreath indoors or outside on your front door – it is a show stopper no matter where you put it!
Materials
- Faux Fall Leaf stems (two of them)
- Pink Plastic Plate
- Ribbon
- Black Construction Paper
- Wire Cutters
- Scissors
- Pencil
- Hot Glue Gun
Instructions
- Start making this red and pink wreath by cutting off the excess stems from your faux fall leaves.
- Then begin to slightly bend the remainder of the stem into a gentle rounded "plate-like" shape.
- Using your hot glue, begin to secure your leaves and their stems to the plastic plate.
- Be sure to bend and twist the leaves to make a nice full looking wreath feel. Hot glue additional leaves here and there to fill in any empty spots.
- On a black piece of construction paper, write "fall" in cursive. Then cut out with scissors and xacto knife. (You can also use a paper cutting machine for this step.)
- Next, glue your "fall" word on the plate.
- Lastly, cut and glue a simple wide ribbon to the back of the plate.
- Hang on your wall or front door.
- Enjoy this fun budget friendly craft!
If you are loving this project, like I am – then be sure to pin this post to make later with your friends!

If you’re looking for other wreaths, you might like these…