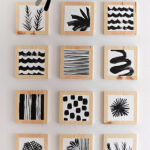
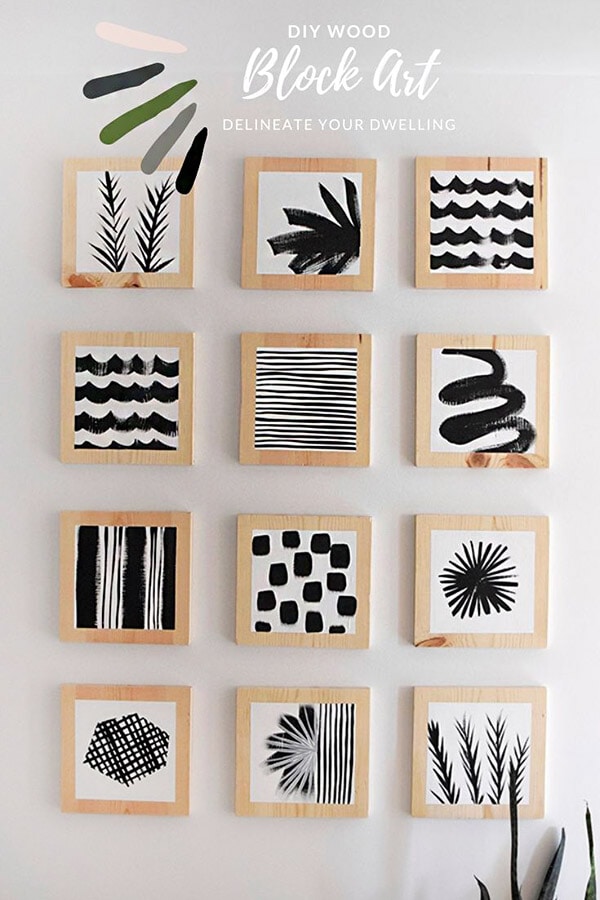
DIY Wood Block Art
INSIDE : Learn how to make flush DIY Wood Block Art to hang in your home. A simple DIY project that brings a big look with very little expense.
This post may contain affiliate links. See full disclosure here.
This post has been updated since it’s original publish date of July 2020.
On Monday, I shared my overall Artistic Hallway Gallery Wall and today I am sharing the step by step tuturoial for how to actually make the Wood Block Art that makes up my new gallery wall.
This fairly small project had many ups and downs. It seemed each step I took, I then took 4 steps backward. But, I learned the best way to do… so you wouldn’t have the same issues I had.
HALLWAY BEFORE
Let’s take a look at the “before” of our hallway. At a little over 24′ in length with seven doorways (yes, you read the correctly 7 doors) and one main entry point, this hallway was very dark feeling, creamy yellow in color and long.
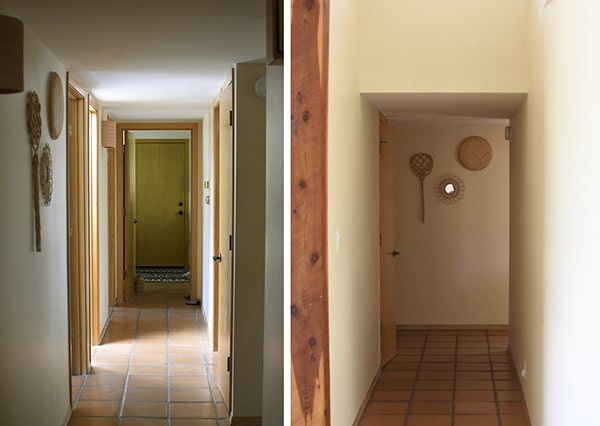
The very first thing to tackle in our hallway was painting it from Navajo Cream to Behr Bit of Sugar white. It made such a huge difference!
You can read more in depth about my Interior Paint colors here.
Looking for easy pre-made black and white abstract art to buy? Check these out:

What supplies are needed to make Wooden Art Blocks?
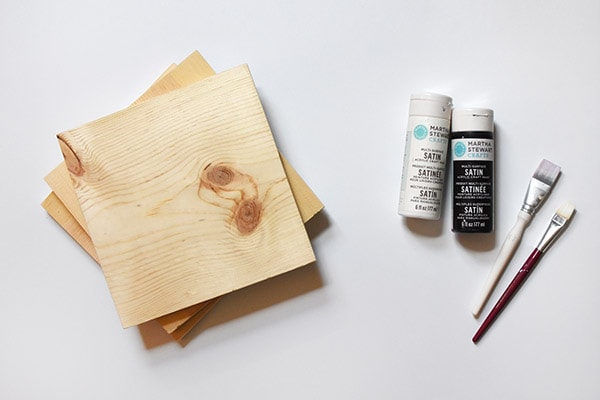
(2) 1″ x 10″ x 6′ Whitewood Boards
Craftsman Sliding Miter Saw
Sanding Blocks
Measuring Tape
Speed Square
Drill Press or Cordless Drill
Woodboring Drill Bits
Quick Grip Clamps
Notebook/Paper/Pencil
Flush Mount Plates
Screwdriver
Masking Tape
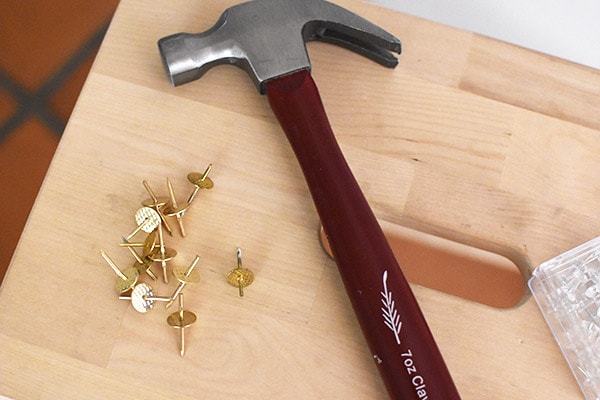
Hammer
(3 packages – 12 hangers needed) Angled Picture Hangers
My favorite DIY basic tools –
Supplies to paint a Wood Block Art
Painter’s Tape
White Acrylic Paint
Black Acrylic Paint
Wide Paint Brush
Smaller Craft Paint Brush
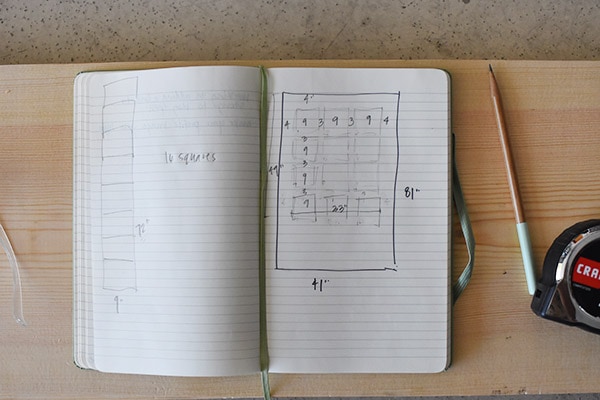
Deciding on your Wood Block Layout
Before even starting on this project, I found it helpful to draw out the space I intended on installing these wooden blocks.
The walkway entry to our hallway is 42″ wide (I mislabeled in my image below) and 81″ tall.
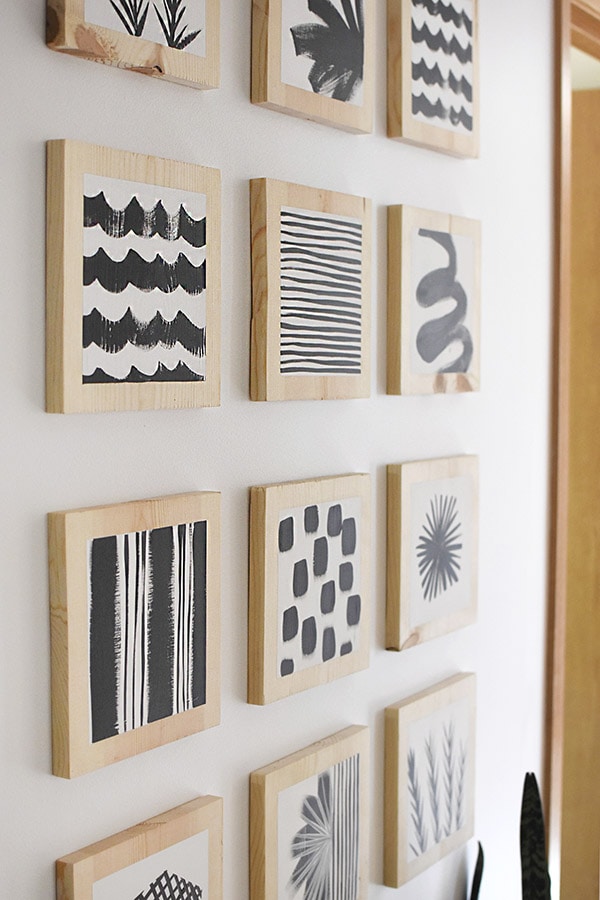
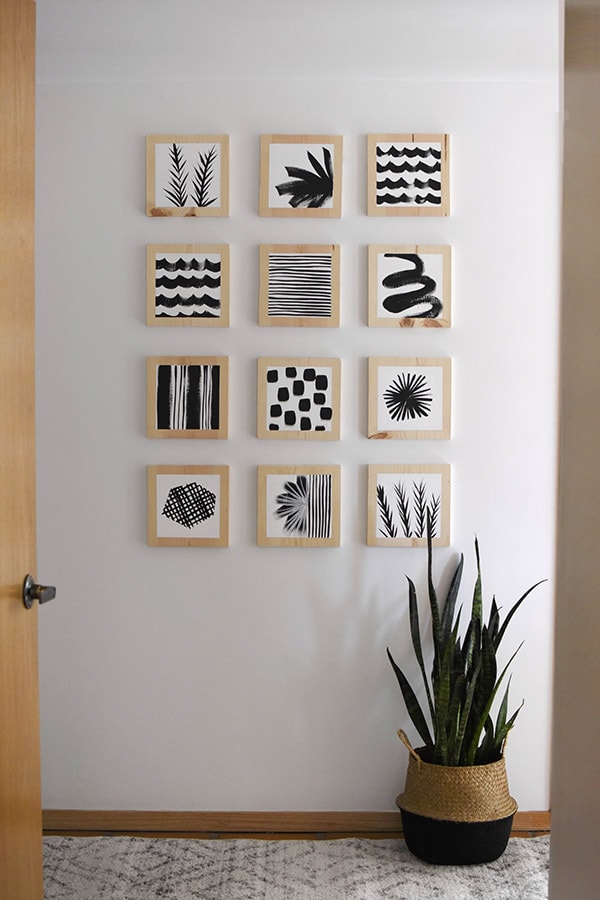
The boards I purchased were 9″ wide, so I decided that I would create three 9″x9″ squares across the space and four 9″x9″ squares down. I approximated that I would mount them 4″ from the top of the ceiling and allow for 3″ between each block.
Cutting down Wood Planks
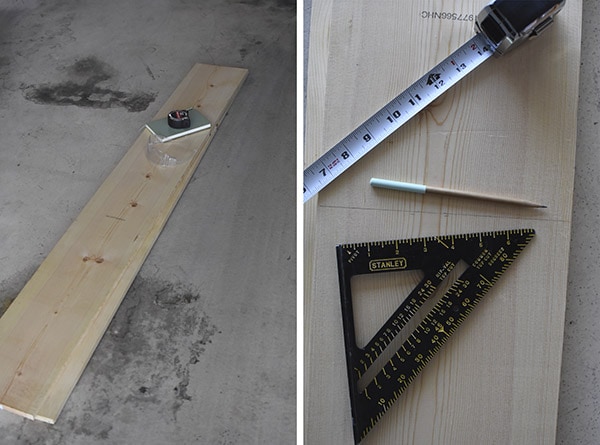
Since I wanted to create perfect squares blocks and since my boards had a 9″ width, I started by using a ruler and pencil and marked every 9″ down the length of my 1″ x 10″ x 6′ Whitewood Board.
Once my marks were made on both boards, I used a Speed Square to help make perfect 90 degree marks. There is a little lip on the edge of the speed square that ensures your marks are straight, it was so much more helpful that just using a ruler and trying to get close.
Next up is cutting the wood. I’ll be honest, this was my second time using a miter saw by myself (our Bathroom Modern Board and Batten was my first time) and it took me at least 15 solid minutes to remember how to unlock the saw to even get started. I remembered there was a lock or screw that I had to pull and it took a moment of fiddling around before I remembered.
ALL THAT TO SAY. Don’t give up if you are new to power tools. Don’t think you can’t do it because you are a female. It’s OKAY to fiddle around a bit to remember that you simply have to push the handle down AND THEN can unlock the saw. (Four years after I built this project, I love reading these encouraging words to myself. My skills have wildly improved, but when you are just starting out – be nice to yourself!)
Check out my Best Beginner DIY Tools post to see what you need to get started on your next project!
A sliding miter saw allows the saw to move and slide as it cuts allowing for wider cuts. Not a deal breaker if you don’t have one, but they are very helpful for wider planks of wood.
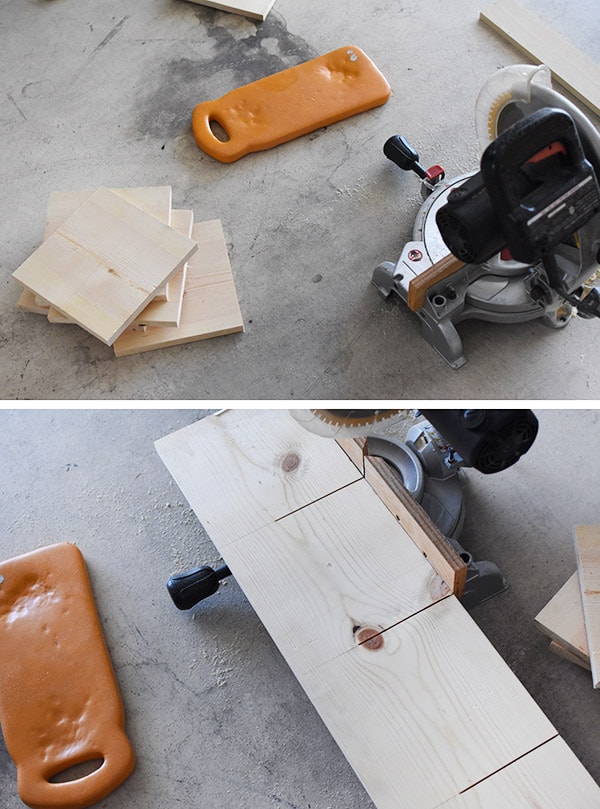
After the boards were cut, I hand sanded each rough edge of all twelve squares.
You could also use an orbital sander and speed the process up significantly.
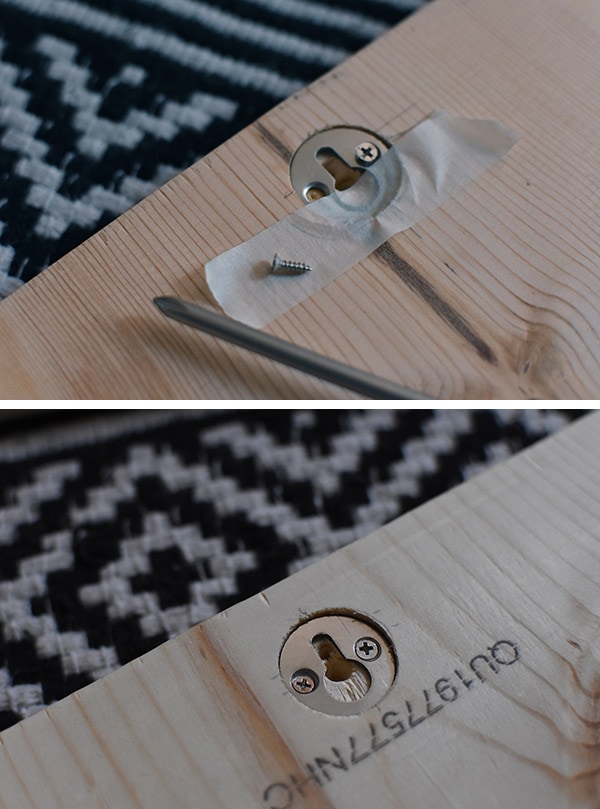
Flush Mount Plates for the blocks
I wanted the wooden squares to be completely flush against the wall. This is not a step that you have to do, although I do love the way they sit so nicely against the wall.
By using a 1″ woodboring drill bit it would perfectly fit my flush mount plate. But, I ended up using a Drill Press for this task, although a cordless drill would just as well.
I began by creating a paper template for exactly where each of my holes would go. I cut out a 9″x9″ square of paper and then cut out a perfect 1″ diameter circle with cross hairs for the center point of that circle.
Then I was able to trace with a pencil on each board, where the center mark for that circle cut would be located. Whether using a drill press or a cordless drill with the wood boring drill bit to make that cut, it doesn’t matter.
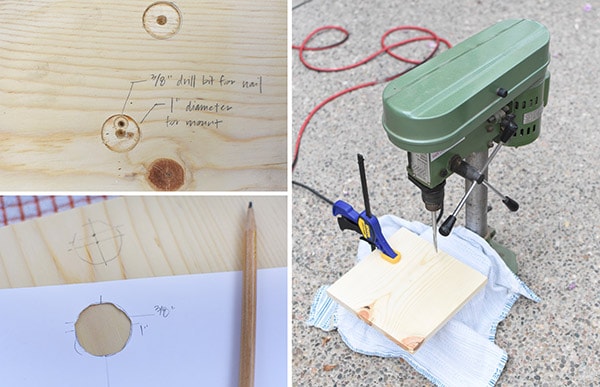
Once all the 1″ circles were cut, I added another cut within that circle using a 3/8″ wood boring drill bit. This allowed for the actual nail that I used to hang them on the wall, to go into the wood.
Next, I placed my 1″ flush mount plates into my drilled out holes. I used a piece of masking tape to hold the plate in the correct direction as I screwed in the screws.
Painting Abstract Art on Wood
Hip hip hooray, we have finally made it to the fun creative part of this project! I started out wanting an organic loose line of white on the raw wood boards. But after painting them, I really did not like how they looked.
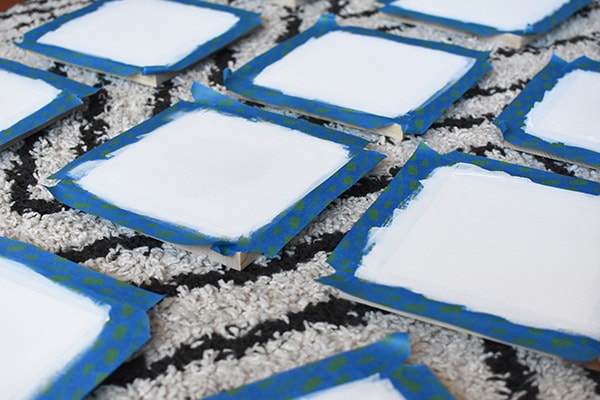
SO… I then measured about 1.5″ from the edge and applied painter’s tape. After the third coat of white acrylic paint, I removed the tape while the paint was still wet. The finished product was gorgeous.
I got a nice wide paint brush and a smaller craft paint brush, a paper plate and a handful of black acrylic paints.
There really is not much I love more than creating my own art work. I have a huge blog post all about making easy art and it includes all of my tips to creating art.
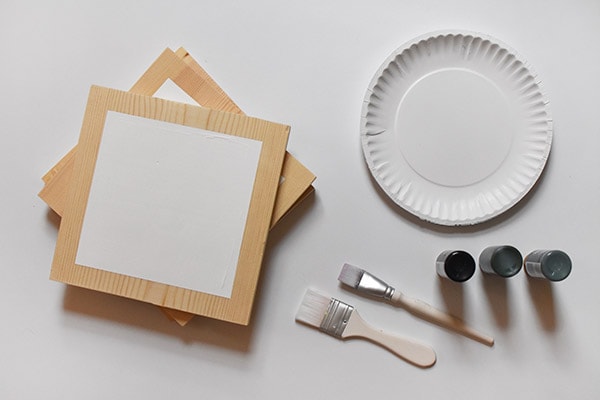
Please note, before I started painting – I sketched out about 20 different small squares and simple little patterns within them. This really helped me narrow down the style and look I wanted before I was worried about messing up on the real thing.
I put painter’s tape back on the edges so I could keep all my designs perfectly within the confines of the white square. I’ll be honest, this was BY FAR MY MOST FAVORITE PART of this project. I wanted to paint a million wooden blocks after this!

Wood Block Wall Layout
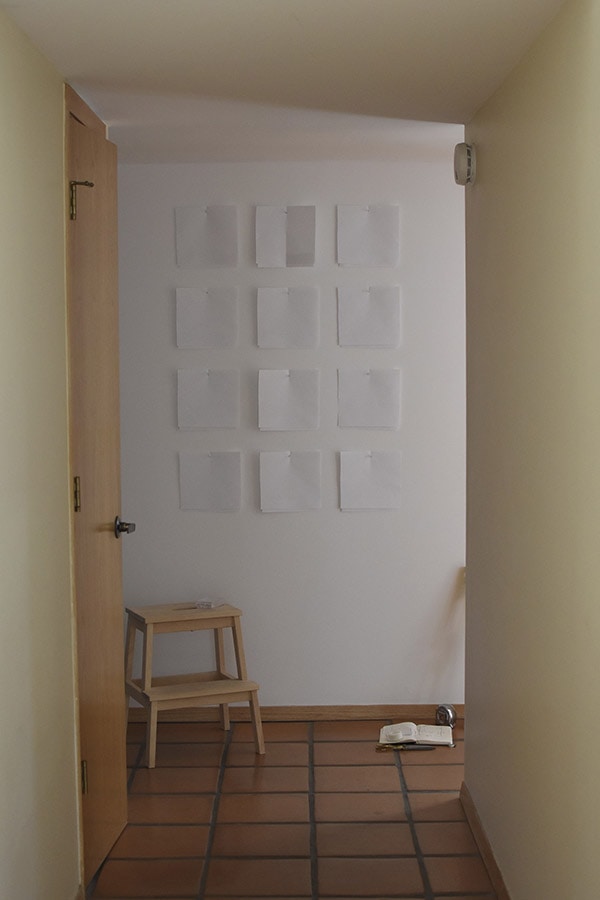
While my squares were drying, I started laying the design on my hallway wall.
I cut twelve 9″ x 9″ squares of paper and taped them onto the wall. This was really helpful because immediately I realized that my original plan of having them start 4″ from the ceiling was WAY too high. I ended up bringing all of them down quite a bit.
To hang my new Wood Block Art I used these angled wall hanger nails which are my VERY favorite for hanging any and all kinds of artwork. They have an angled plate on the nail, so as you hammer into the wall, the plate eventually rests perfectly against the wall and gives you extra holding power.
DIY Wood Block Art
I honestly can not tell you how much I love this project’s outcome. It took me five weeks from the start of painting the hallway from cream to white and then ending with this art installation – but it was well worth the effort!
Check out how these gorg pieces of art all came together in my Artistic Hallway Gallery Wall. I even share the runners I selected, too!
MY Home –> Want to check out more rooms in my home?
I have shared inspiration, tips and inexpensive ways to make your home YOU.
Want to shop my completed hallway?
Looking for other creative wall decor ideas?
And I’m excited to announce that HGTV just shared my project on their Instagram account, HGTV Handmade! Make sure to go check it out, here.
Looks amazing, soo pretty!! Love it.! Wow 🙂
Great job!
Thank you!