How to customize any notebook

INSIDE : Learn how to customize your notebook cover in a few simple steps using fun and colorful scrapbook paper! Personalize your notebook to reflect your style.

Learn how to customize your notebook cover in a few simple steps using fun and colorful scrapbook paper! Personalize your notebook to reflect your style. Delineate Your Dwelling #customnotebook #DIYnotebook #DIYcover

This post may contain affiliate links.  See full disclosure here.

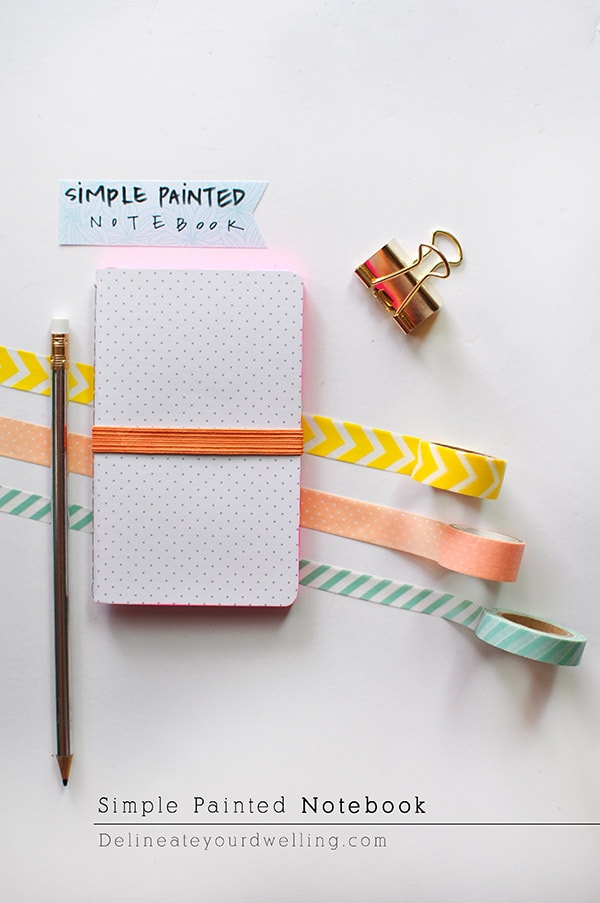
I love paper.  I love pretty paper.  I love paper calendars.  And I really love journals and notebooks.  Some people go crazy for purses and shoes, I go crazy for paper products (totally cool and normal, I know).  Today I am sharing, How to customize your notebook cover!

I was on the lookout for a nice notebook.  I searched Target for weeks, I went to Anthropologie and I even checked out Francesca’s.  I kept coming up empty handed.  Finally, I bought an inexpensive notebook and decided to take on the task of making it my own.
 

What supplies will I need for a custom notebook?

A notebook
Scrapbook paper 
Gold Scissors 
Ruler
Pencil
Sponge Brush
Mod Podge

How to make a custom notebook, Delineate Your Dwelling #paper #journal #craft

Steps to make a custom DIY notebook.

I picked out papers for both the front and back notebook cover.  And also a third scrapbook paper for the interior of the notebook.  

First, I started by covering my notebook binding.  I measured out 2″ on either side and the length to match the notebook with no extra.  I then, applied Mod Podge to the paper and the notebook binding area.  They adhered quite quickly.
Then, I laid my notebook on top of your paper and mark out 2″ from the edge of the notebook.  For the corners, I cut them in a diagonal and treated them as if I was wrapping a present.  A little mod podge on both sides and the front was done.

The back of the notebook had an elastic band attached.  I very gingerly pulled one edge of this band out of the notebook.  Then, I measured exactly where the cutouts needed to be located in the scrapbook paper and then fed the elastic band through them.

Using a heavy duty stapler, I then stapled the end of the elastic back down, applied Mod Podge and secured that back cover.

Learn how to customize your notebook cover in a few simple steps using fun and colorful scrapbook paper! Personalize your notebook to reflect your style. Delineate Your Dwelling #customnotebook #DIYnotebook #DIYjournal
 

Here is how the back turned out.  Clean and simple.

Learn how to customize your notebook cover in a few simple steps using fun and colorful scrapbook paper! Personalize your notebook to reflect your style. Delineate Your Dwelling #customnotebook #DIYnotebook #DIYjournal
 

The final product was so much better than anything I could have bought at a store!

Learn how to customize your notebook cover in a few simple steps using fun and colorful scrapbook paper! Personalize your notebook to reflect your style. Delineate Your Dwelling #customnotebook #DIYnotebook #DIYjournal
 
 
Learn how to customize your notebook cover in a few simple steps using fun and colorful scrapbook paper! Personalize your notebook to reflect your style. Delineate Your Dwelling #customnotebook #DIYnotebook #DIYjournal

Since I will be using this notebook at an upcoming conference (Alt Summit), I wanted a place to have extra business cards to pass out at a moment’s notice.  Here are my cards.

Learn how to customize your notebook cover in a few simple steps using fun and colorful scrapbook paper! Personalize your notebook to reflect your style. Delineate Your Dwelling #customnotebook #DIYnotebook #DIYjournal
 
And to easily store them, I attached this fun library card holder inside the front cover.
 
Learn how to customize your notebook cover in a few simple steps using fun and colorful scrapbook paper! Personalize your notebook to reflect your style. Delineate Your Dwelling #customnotebook #DIYnotebook #DIYjournal
 

Oh yes, I also added the green polka dot paper inside both the front and back covers to hide the exterior paper wrapping around.

Learn how to customize your notebook cover in a few simple steps using fun and colorful scrapbook paper! Personalize your notebook to reflect your style. Delineate Your Dwelling #customnotebook #DIYnotebook #DIYjournal
 
I could not be more thrilled with how this notebook turned out.  I’ve been so tempted to start jotting some notes in it here and there, but am holding off until Alt Summit.  Will power!
 
Am I the only one who is paper crazy?  Please tell me there are others out there.
 
If you liked this project, you may like my Simple Painted Notebook post.
Simple Painted Notebook, Delineateyourdwelling.com
 
Speaking of paper, I am now selling a paper To-do list!  
Who said staying organized can’t be functional and pretty?!
To-Do List Clipboard-SIDEBAR


41 thoughts on “How to customize any notebook

  1. I just love reading blogs like this one. And thank you very much for sharing these tips with us. Besides the fact that this blog is brilliant and the tips are awesome, I have to say that this text is so positive, helpful, full of joy.

    1. Aw, thanks Emily! Go find yourself a cheap journal, even at the Dollar Store and grab your favorite scrapbook papers — you’re good to go!

  2. In accordance with “yael’s” comment…
    Hey! Your tutorial is so cute. I will so be doing this! Where did you get your notebook? I’m trying to find one that’s sturdy and also larger like that. Thanks! 🙂

    1. Thanks so much, Olivia! I got my notebook from Target, it was just $5 and pretty ugly… it worked perfectly!

        1. The smaller notebooks came in a pack of three, also from Target. Those however, I didn’t have to make any changes to.

  3. Hi! I love what you did.
    Can you please write where can I find the little notebook that is in the pictures?…
    Thank you so much

  4. This was not your original idea. You should give credit to the blogger who did a similar project to this one on her blog before you did this project. I understand that there are not a lot of original ideas in the blogosphere but, at least, give credit to where you get your inspiration for a project from and don’t just claiming it as your own.

    1. The wonderful thing about the internet is that there are so many creative people sharing their work. There’s bound to be similar ideas floating around! 🙂

  5. Hi there Amy, so nice to meet another for whom the “love of paper runs deep.” Visiting you via “HitMeWithYourBestShot” linkup where I discovered your post on DIY wedding invites. But then I couldn’t resist seeing your other lovely paper creations. They did not disappoint. Lovely to meet you.

  6. Wow! I would have never known that wasn’t the original cover… I’m headed to check out the clearance section right now. I can turn any book into what I want 😀 Thanks for linking up at My Favorite Things Saturday!!

  7. I love paper and notebooks, but my husband (fairly) teases me for writing in just the first few pages of all the notebooks I have. So recently, I’ve neatly removed such pages and put in a folder to make a scrapbook of all my journal entries on random sized papers, hopefully in chronological order. Wish me luck!

  8. I LOVE scrapbook paper too Amy! I have a whole hutch full of it…I’m sure I won’t be able to use it all in my whole lifetime, but it’s so pretty…and I do buy {even more, gasp} when I fall in love with it! However, I never buy a birthday/wedding/etc card, I always make my own, and I use my pretty papers for SO MANY things!

  9. I figure as long as I have the Modge Podge out May as we’ll use it so I’ve been making greeting cards to sell on Etsy, covering papier mâché boxes w/cute paper to use as storage in the bedroom & covering empty oatmeal boxes to use to store bulk grains from the coop. Now I must cover notebooks

  10. What a fabulous how-to! Thanks so much for sharing on Cook it! Craft it! Share it! I pinned this to our group board and am sharing it on my Facebook page tonight! 🙂
    Ang

Leave a Reply

Your email address will not be published. Required fields are marked *