How to Make Inexpensive CLAY KNOBS!
INSIDE : Learn how to craft Inexpensive Air Dry Clay KNOBS that look and feel like the real deal, except are a fraction of the cost.
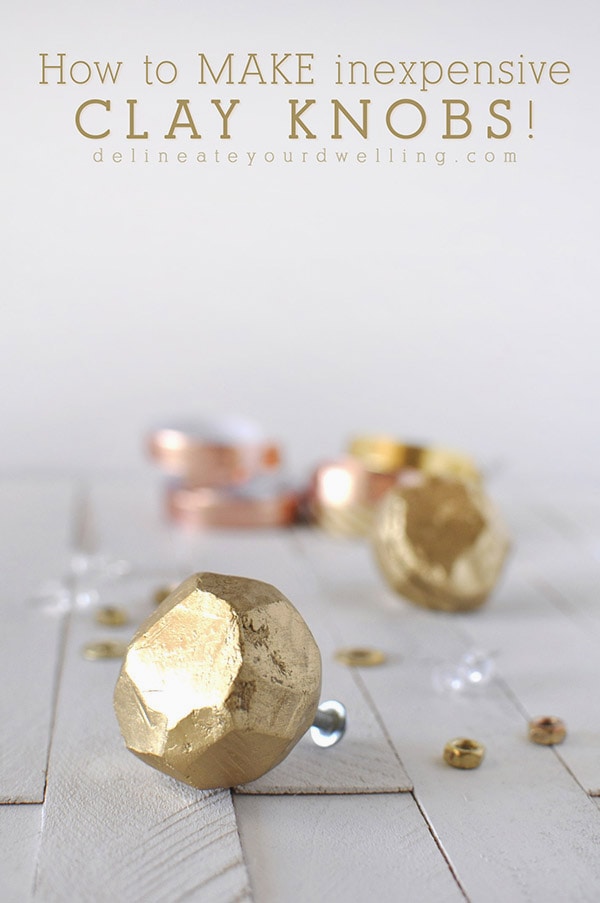
Does anyone remember that I’m currently updating our Master Bedroom? I started the update…. a while ago and I’ve been making progress. However, real life and young kiddos and colds and JURY DUTY dictate that things like entire room updates happen slowly. I have no idea how all my blog friends can do these 6 week complete room transformations because mine always seem to take 6 months! Anyhow, today I am really excited to be sharing another a DIY for the room, How to Make Inexpensive CLAY KNOBS!
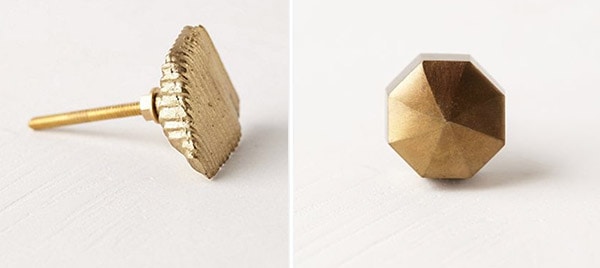
As you may or may not remember, I have challenged myself to update the look of our master bedroom with as little cost as possible. I have been swooning for these Anthropologie knobs forever… however, with two night stands, a tall dresser and a long horizontal dresser there was no way I could afford $10 a piece knobs.

This post may contain affiliate links. See full disclosure here.
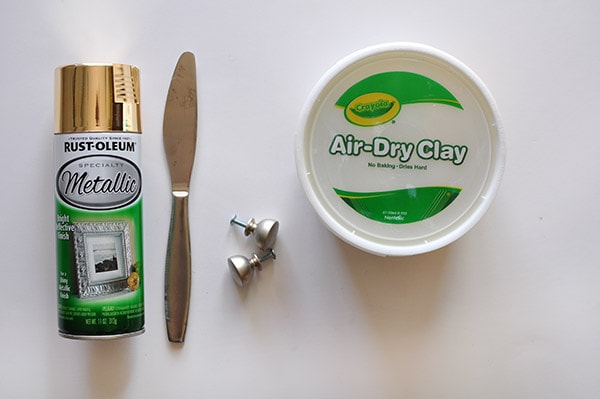
Rust-Oleum Gold Spray Paint![]()
A butter knife
Existing Knob Hardware
Air Dry Clay ![]()
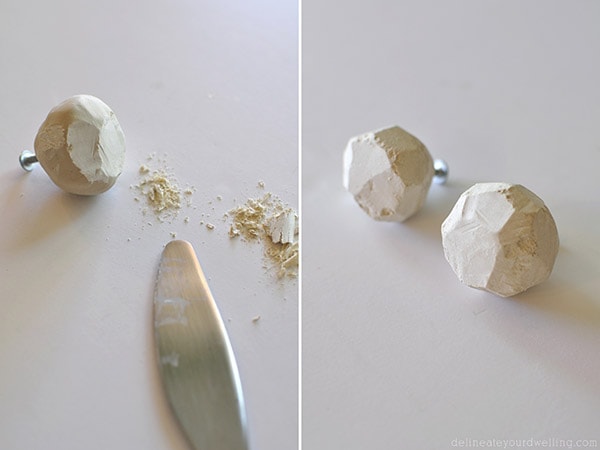
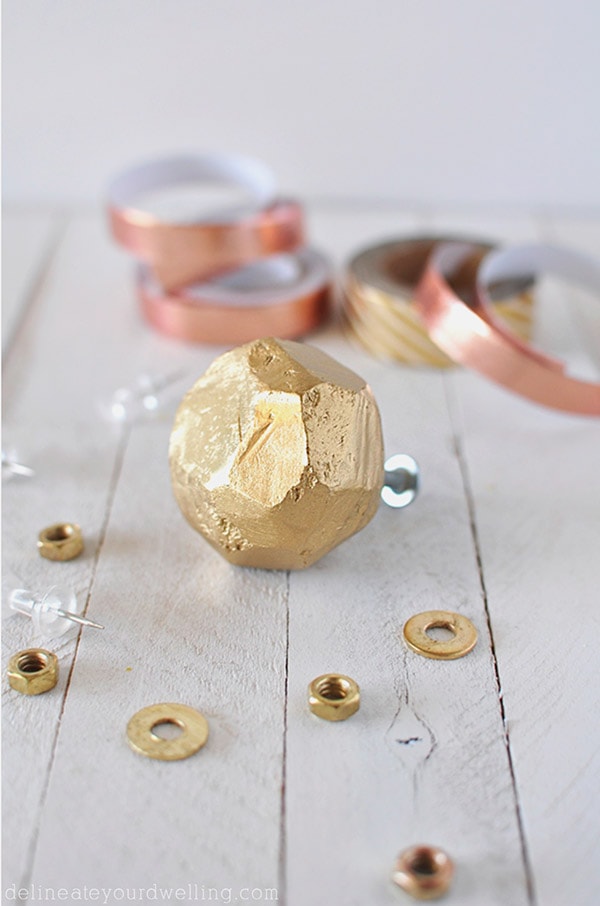
The first step is covering your existing knobs with the air dry clay. I made a ball and then pushed the knob into the ball. Then, I slowly added small amounts to the sides until I had a nice even clay ball.
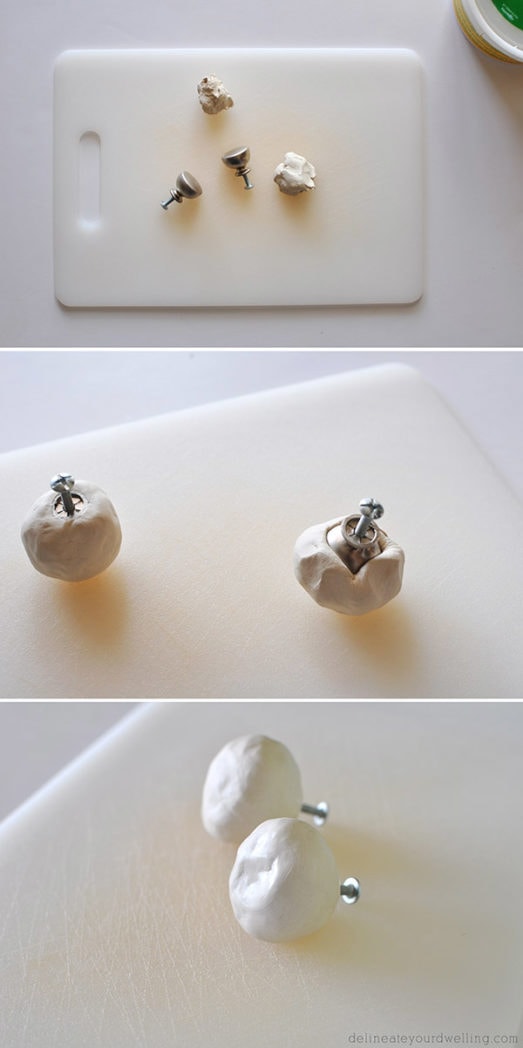
Then, you let the beauty of air dry clay start… it just sits there and dries out. I waited one day and it was dry enough to start carving. There is no rhyme or reason to the shapes. I simply went around and cut off all the rounded edges. This gives you a nice geometric cut look (inspired by Anthro’s knobs but tweaked to my own taste).
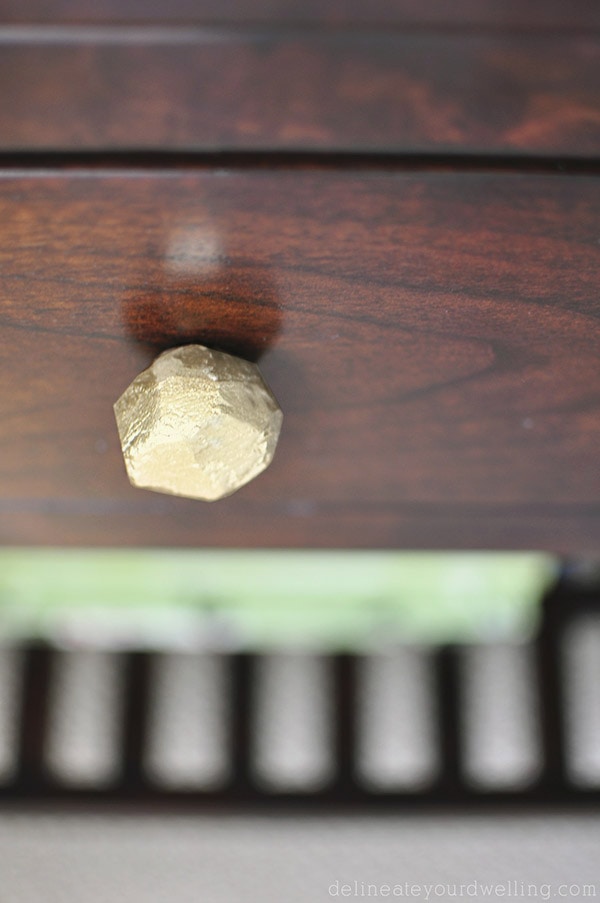
After, I cut down the clay knobs I let them completely dry out. This typically is another day. I gave each knob two coats of my all time favorite spray paint, Rust-oleum’s Metallic Gold and was ready to install.
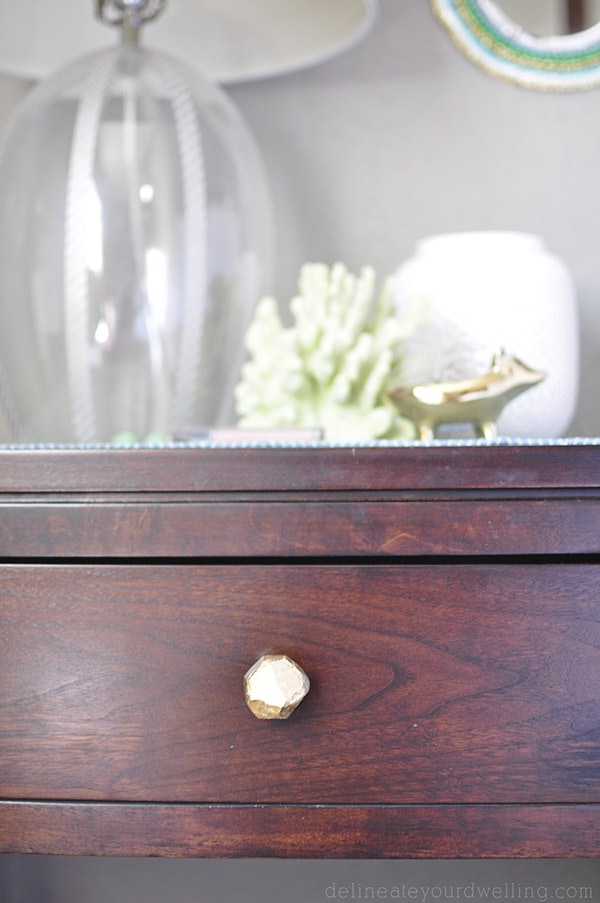
I ended up just making two, one for each of our night stands. They are the perfect amount of gold loveliness against the dark wood.
All in all, I would have been out $20 +tax had I gone the Anthropologie route. My inexpensive DIY route was practically free. I already owned the knobs, I used about $0.15 worth of clay (estimating – a 2.5 lbs tub is only $4.50) and already owned the spray paint!
Note: It was brought to my attention that these knobs may not withstand heavy use. Mine however, are used fairly infrequently and are still intact.
Looking for some of my Air Dry Clay projects? Hope you are inspired by them!
I’ve been exploring https://terpenewarehouse.com/collections/terpenes-for-sleep recently, and I’m indeed enjoying the experience. The scents are rich, real, and pleasant. They add a outgoing drink to my daily habit, ration fasten on the atmosphere and atmosphere. A great track down quest of anyone who appreciates savoury wellness tools.
Awesome post.
As a huge Anthropologie fan (but unfortunately, a poor one too), I saw this and knew I had to do it! They are so easy to make but look super great! I’ve gotten lots of “wow i can’t believe you made those yourself” remarks. One of mine did crumble while i was re-installing it to my dresser, so i just had to make another one. Otherwise, they have been holding up well and I love them! Thanks for the awesome DIY 🙂
Yay, I’m so glad to hear they are working out for you!! One of mine crumbled, too. I’m just exceedingly gentle with mine now and they seem to be holding up okay!
These are awesome! I have 18 ugly Ikea pulls that are begging for this makeover! Any updates or further advice on the crumbling issue? I’d like to make these for my bedroom dresser that gets used daily. Do you think adding a final coat of mod podge or something like that would keep the clay together better?
Noelle: Thanks! I think this technique would probably be best for less used pulls. Mine are holding up but they are rarely used, I would worry about heavy daily use with air dry clay. Maybe you could buy store bought pulls for the daily use ones and then DIY the other ones?
Why dont you use the craft clay that you bake. Its very tough snd could be wrapped around anything like metal or wood that wont melt. God bless.
That’s a really great idea!
Try using a different clay on it. Maybe polymer? I’d do a little Google research on it, but any air dry clay will crumble with much use. It’s very foamy feeling when it’s done, much like a child’s squish toy. Hope you find something that works for you 🙂
I made these, LOVED how they looked, but after less than 1 week they all started cracking and eventually fell apart 🙁 Not sure what the solution would be.
maybe sculpey clay instead!
First of all, yay for trying this. But, oh no, Danielle!! I’m so sorry to hear they ended up crumbling apart. I really don’t use mine all too much… so they seem to be okay still. Sculpey clay is a great idea. I’ll add in a note at the bottom about this. Thanks for letting me know.
Amy these are amazing! I love how raw and expensive they look. I need some like yesterday. Thanks for always partying with us!!
Aw, thanks so much Kathy!! I’ll send you some yesterday! =)
These are awesome!! The look great on your dresser! Found you linked up over at The DIY Dreamer!
Thank you so much, Fotini! They were so simple to make, too!
That. is. awesome. We just moved and I’m wanting to do some knob updating myself…and I happen to have a whole lot of clay and spray paint!
Yay, these are a cinch to make!! Have fun.
This is awesome idea.. Love it 🙂 Thanks for sharing dear!
Thanks so much, can hardly go wrong with air dry clay and GOLD! =)
These would be so great to glam up some cheap IKEA stuff! I love it!
Oh love that idea!!
GAH!
these are GENIUS! I love them <3 thanks for sharing!
Ah, thank you so much!!
Genius Idea Amy! I am forever drooling over Anthro Knobs for my furniture makeovers but they would cut down on profits 🙁 You always amaze me with your skills!
Oh thank you, Gilly! Such kind words and I just had to do SOMETHING because those Anthro knobs get me every time! =)
So awesome Amy! I’m totally obsessed
I love the knobs, but every time I have worked with the air dry clay, whatever I make wants to crumble, I also let it dry completely so that’s not the problem. I used the same brand as you have. Don’t know what my problem is….
Hm… Sandra, is the clay crumble when you first take it out of the container or does it crumble as it dries? I wonder if it’s not get enough moisture to start with? After I use some clay, I added a few drops of water to the container of clay before putting the lid back on. It’s helped extend the lifespan of my non-used clay.
Thank you for answering my comment. The clay is moist and easy to work with. I made a toe for a Ceramic Bunny I had that I had broken, looked great, glued it on, next day crumpled off, tried using it with other things after it dried, falls off. Will keep trying, hopefully I will get the hang of it!
Oh… do you mean that the glue doesn’t hold against the clay?? Maybe that is the problem? A different type of glue?
Try a two part epoxy clay. Air hardens. Sticks to anything.
Ah, that’s a great idea. I’ve not used epoxy much before. Thanks for sharing!
Thank so much, Julia!!
DUDE! How did I miss these?! Obsessed.
Ha, you’re too kind Bre!!!
Well. These are just awesome. Can I have just a little bit of your creativity?!
Oh you are too kind, Amanda!
Wow, I just love the outcome! I’m definitely going to try this. Thank you for sharing. Pinning this now.
Aw, thanks so much Carmia! Be sure to tag me if you make them, I’d love to see how they turn out!!
These are FANTASTIC!! I forgot about this product . . . ohhhhh, the possibilities!
Aw, thanks for you kind comments Lori! Yes, I love love air dry clay, it’s the best!
These are SOOOOO fun! I was no lie thinking of a fun way to update my standard boring knobs in my room and these might be it. I was looking at buying some and I would have to buy a ton too!
Yay for making gold knobs!! =)
I have been loving these knobs as well! It’s so awesome to see this DIY, ’cause I don’t have the money for the expensive ones! Thank you! I am so going to make these!
Yay for making your own gold knobs!! Be sure to tag me on Instagram, I’d love to see how they turn out. =)
These are fabulous! Thanks for sharing the tutorial. (Pinned and scheduled to share on my FB page!)
Thank you in advance for the pin and FB share, Bethany!!
Wow!! This is the coolest idea ever! I would have never thought that was a clay knob in a million years! Thanks for sharing!
Aw, what a complement Reshma! Thanks for stopping by today.
oh this is genius! i love this idea!
Thanks so much, Cassie! It was so fun to make.
SO super cute Amy!!!
Thanks, Kristi! I want to make a million gold knobs now, ha.
These are so great! What an easy project that has such a big impact!
Thanks so much, Sarah. It seems Air Dry clay can do no wrong!
These are so pretty!